Friday, 9 November 2012

That Friday Feeling...Giraffes!

I've just been talking to one of my close friends via that fabulous invention of Skype and asked her what I should pick as my theme this week. She didn't really know what I was talking about when I said 'theme' but asked if it could be anything, like... for example...giraffes? Well yes, yes it can be a shout out for giraffes! This week's Etsy shout out is dedicated to you Shannon of MosaicGeek fame - I hope that next time we speak on Skype you sing me the song I've added at the end...!

Anyway, for those of you who don't know, I do a weekly shout out of some lovely things I've found on Etsy based around a theme. This week's theme is giraffes, of which there are many cute examples on Etsy. Do go and have a search yourself but also visit the shops I've featured - they are great!

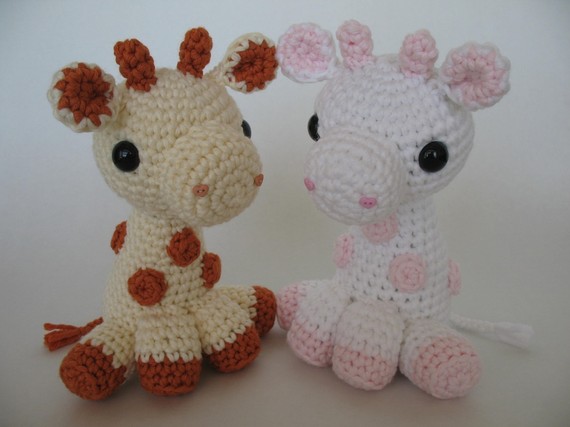
What a cute giraffe crochet pattern from djonesgirlz

Sweet little giraffe earrings by fingerprince

I love this giraffe diaper bag by pollywogsandtadpoles

What little snippets of giraffe information shall I add?
  • A giraffe can clean its own ears with it's tongue. Personally I wouldn't want to but always a good party trick I suspect... Their tongues are about 2 feet long. 
  • Because they are always on the lookout for predators, giraffes sleep very little. They average about 30 minutes a day. And other animals use giraffes as lookout posts for predators. 
  • Giraffes can eat about 35 kilos of food a day. They are herbivores and have a strong liking for accacia trees which have all the nutrients they need bar calcium and salt. Because accacia stores water in its leaves, it also helps in keeping giraffes hydrated. 
  • However, when giraffes do go and find some water, they can drink up to 12 gallons of water in one go.
  • A baby giraffe is about 6 foot tall at birth.
  • If they are attacked and cannot run away, giraffes will kick at their predators - and their hooves have been known to sever a lion's head!
  • Giraffes can run at 35 mph although only for a short period of time. 
  • It is illegal to tie a giraffe to a lampost in Atlanta. Which makes me wonder when giraffes were so prevalent there that they had to introduce that law...?!
  • Giraffes cannot cough. Must be a real pain if they get accacia leaves stuck in their throats...!
  • Giraffe markings are all individual  - no two giraffes have exactly the same markings. 
  • Today's YouTube clip is verging on the ridiculous but for some reason I don't know many songs about giraffes... can't think why! Anyway, it MUST be fun to be a giraffe! 


Monday, 5 November 2012

Exciting News!

I am super excited at the moment because... I've had my first ever quilt commission! I was showing some of my quilts at Tootopia back in September and a lovely customer asked about some of my designs. Last week I got an e-mail asking if I could make a commission quilt featuring some owls and foxes for her expected niece/nephew. I found a few options and we put this combination of fabrics together:


When I actually got the fabrics I realised that they needed something a little extra to stop them from being too busy and mind-boggling so I tempered them with some plain lime green fabric as well. My lovely customer was quite specific about the quilt being non-gender specific so I used green instead of blue which would have been the more natural match in my head. As a finishing touch, she wanted the quilt to feature some stars as well so we used some red fabric with white stars as the binding. What do you think of the finished product? It has a stripy backing as I couldn't find another suitable backing material (which is insane considering how many colours are featured!) so I've used the same fabric as the stripes in the main quilt. It still needs me to sew on a label and finish off some of the threads, but other than that, it's done and ready to go. 


Friday, 2 November 2012

That Friday Feeling...Winter

Brrrr, I know it's only November so the proper cold, snowy months have not yet started but I haven't been able to feel my toes for days now! I am soooooo cold! So what better theme for this week's Friday Feeling than Winter? Here are some of my favourite finds of the week - please do go over to Etsy and have a look at some of the shops I've featured (click on the links in the captions) and also go and have a search generally. It's that time of year when we start thinking about Christmas presents (I said it, the dreaded C word) so Etsy is a good place to start looking. Lovely handmade gifts all round!

Cute little ceramic brooch by LoveandLovelier

What about a wintery cushion to remind you it's warm indoors! By maximilia

Love this chunky scarf by KnitFrekkles 

 I'm not sure whether I want to share any wintery facts with you today... they might make me feel even colder! I'm presently wrapped up in a scarf AND a cowl in a cafe which technically should have heating. And when not typing I'm clutching a mug of hot tea! OK, OK, here are your fun facts for the week:


  • Icicles most often form on the south side of buildings
  • The record for most snow angels at one time was made in Ontario, Canada in 2004. A number of schools joined forces and 15,861 were created.
  • Wind chill is a measurement of heat loss on exposed skin
  • The coldest temperature ever recorded was in Antarctica (no surprise then!) of -129 Fahrenheit (-89 Celsius)
  • Snowflakes fall on average at 3.1 miles per hour
  • The tallest snowman was given a name! He was called Angus and measured 122 feet (37 metres)
  • Ten inches of snow melts down into 1 inch of water
  • A single snow storm can drop more than 40 millios tonnes of snow, which has the energy equivalence of 120 atomic bombs.
  • Apparently if squirrels start building their nests on the lower branches of trees it means we're going to have a really cold winter. The same goes if ants build higher than normal mounds or birds start migrating early. 

Friday, 26 October 2012

That Friday Feeling...Hallowe'en

Wooooooooh! It's that spooky time of year again when bats and cats, witches, skeletons and ghosts are all on the prowl for All Hallows Eve. So what better time to have Hallowe'en as a theme? I have made one item for Hallowe'en - a pumpkin keyring:


But there are LOTS of lovely Hallowe'en themed items on Etsy this week - feel free to go and search yourself but here are my picks of the week.

I love Madmumknits' designs and these tea cosy patterns are no exception! 

I love the colour of this hand-dyed yarn by CountessAblaze

How cute are these little Jack-O'Lantern earrings by CobwebDesignsCoUK
I'm sure we all know quite a lot about Hallowe'en already but, here are my snippets of information for the week...

  • Hallowe'en celebrations date back thousands of years (well between 2000 and 6000 years depending on your source). 
  • The tradition of wearing masks comes from Celtic tradition. On Samhain the spirits of the dead return to earth and visit the living. The masks are worn to prevent the dead from recognising the living. The tradition of costumes is American and dates from harvest celebrations where people wore costumes, ate sweets and played practical jokes on each other. 
  • The tradition of playing practical jokes got out of hand and a bit ugly in the 1930s and, as a substitute for it, the tradition of going door to door to collect candy was introduced. Although trick or treating is also a continuation of the tradition of putting treats outside the door in Celtic tradition to ward off bad spirits.
  • Jack O'Lanterns originated in Ireland and were originally hollowed out turnips with candles placed in them to ward off evil spirits on Samhain.
  • If you see a spider on Hallowe'en it is said to be the spirit of a loved one watching over you. So they are actually good luck! 
  • About 99% of all pumpkin sales are used for hollowing out and making Jack O'Lanterns.
  • Bobbing for apples is a Roman festival tradition - it was played at feasts to the goddess Pomona, the goddess of fruit.
  • In Scotland, unmarried girls supposedly see the face of their future husband if they hang a wet sheet in front of a fire on Hallowe'en.
  • The name bonfire night originates from 'bone fire' - in the run up to the harvest, fires were lit to persuade the sun to return after the cold, dark winter. Often cows and sheep were thrown in as sacrifices hence the 'bones' 
  • England tends to celebrate Bonfire Night (5th November) instead of Hallowe'en because the date (31st October / 1st November) are Catholic feast days (All Saints and All Souls) and Protestant England wanted to distance themselves from the Catholics. Celebrating the execution of Guy Fawkes (a Catholic) who tried to blow up parliament and put a Catholic king on the throne was a good way of keeping the festivities but putting a different slant on it. 
  • This week's YouTube video had to be Ghost Busters because it's such a classic. Enjoy and HAPPY HALLOWE'EN! 


Thursday, 25 October 2012

Inspired: London

I'm really excited today as tonight I am going to the pre-launch party of Inspired: London - a book that is all about fabulous designers and artists from London. I can't remember if I ever actually wrote about it here, but I am lucky enough to be one of the featured artists in the book, so it has a special meaning for me.  I've never been featured in a book before (although I was quite excited to be quoted in the Guardian a few weeks back - about a book I'd read) so this is an exciting time for Creating Trouble. What's even more exciting is that I am finally going to meet some of the fabulous artists and crafters that I have been in contact with over the past year or so. Here's what the front cover is going to look like:


The actual book isn't properly launched until 10th/ 11th November during the Spitalfields 'We Make London' fair but if anyone is going to the We Make London fair in Chelsea on the 4th November I know it is available there. The book costs £12.99 although it is available at the Chelsea and Spitalfield's markets at £10.99. It's going online for sale officially on 11th November so if you're wondering what to get a friend for Christmas, this might be a good call... in the hope that they will buy you a lovely present from one of the designers featured! I can't wait to see what it looks like - I've seen a few sample pages as I was making up my own page but other than that, it's all been top secret for the past few months.

I can't wait for tonight's pre-launch party as it will be a fantastic opportunity to meet some fellow creatives who share similar interests. YAY!

Monday, 22 October 2012

How To.. make a SEWING BOARD

Does anyone else experience the disaster of the sewing box? Admittedly I usually use a tin for all my threads - I have a gorgeous sewing box but it's totally full up with ribbons and fabrics so my threads end up drawing the short straw and living in an old chocolate tin. I can't even bring myself to show you a photo of what it normally looks like but trust me when I say it usually takes about 20 minutes to get some thread out of it.

I came to the end of my tether with it all this week and decided enough was enough! I need something that will keep all my threads and bobbins separate. So I thought I'd make a 'sewing board' - basically a sewing box on a pinboard! Here's this month's How To tutorial. Hope it helps!

What you'll need:
1 piece of board
Enough fabric to cover the board
Some wadding (optional)
Tacks - choose long ones that are about the length of an average spool of thread
Hammer
Glue - fabric spray adhesive works best but PVA will work if you haven't got anything better to hand!
Scissors
Ribbon for 'washing line' effect
Some fabric in a contrasting colour for pockets
Elastic
Sewing machine (not essential)

What to do:


1) Cut your board to the size you want - if you are using a saw please be careful and keep fingers away, always saw on a stable surface and follow the instructions.


2) Cut a piece of fabric a little larger than the piece of board you want to cover. I used an old scarf that I never wear and the width was almost right. You need a few inches on all edges.

3) If you want a padded board (that you can then stick pins into or add extras to) then cut some wadding to the same size as the board and use spray adhesive to stick it on securely. If you don't have spray adhesive, just use whatever you do have - I only had PVA when I made mine and it still sticks it fine!

4) Start with your pockets - this is where I can't give many photos as I stupidly decided to do mine at the end so had to hand sew them on and it resulted in bent needles! BUT... start by drawing yourself a semicircle on some pretty fabric with a widened flat top. Remember there will be seam allowance so think about how big it will be when you fold over the seams.

5) Cut out your semi-circle and then cut 2 pieces of fabric using the semicircle as a template.

6) Fold over about an inch from the top of your semi-circle and pin it. If you place your pins at 90 degrees to the line you sew, you don't need to tack it as well.

7) Sew in a straight line near the edge of your seam leaving a good half inch space between the top of your semi-circle and your seam.


8) Attach a safety pin to the end of some elastic (don't cut the elastic yet!) and, using the safety pin to hold onto, thread your elastic through the seam.

9) Sew along one edge of the elastic to hold it in place. Then pleat up your fabric until it is about half the width it was before and sew the elastic in place on the other end. Repeat Step 6-9 with the other pocket.


10) Place your fabric over your board, right side facing up. Adjust so that you know exactly how it will fit (with an even amount hanging over each side. Place your two pockets about half way down and fold under the edge of the unsewn edges. Pin in place, making sure you pin the pleats too - you don't want to sew the fabric straight.

11) Sew along the folded edges of your pockets, leaving the elastic opening free.


12) Now for attaching the fabric to the board... Place your fabric face down on a flat surface. Spray your board's padded side liberally with adhesive - or smother it evenly with glue if that's what you are using.

13) Carefully turn the board over and place it centrally over the fabric and press down. Trim the corners so that you don't have too much bulk.

14) Pull the top edge taut over the back of the board and glue it down. Do the same to the other edges. Make sure you keep it as taut as you can as otherwise you'll end up with puckered fabric.

15) Cut a piece of ribbon about 3 - 4 inches longer than your board. Glue one side of it and attach it to the back of your board, below your pockets.

16) Turn your board over and stretch your ribbon tight over your board in a straight line. Pull it around to the back of the board and glue the other end onto the back. Make sure you keep it taut throughout this. This will give you a cute little 'washing line' that you can pin things onto with pegs or, if it's taut enough, you can keep paper safe by tucking it under.


17) You're ready to do some hammering! Turn your board so that you have the wrong side up and put it on a stable surface. Balance it so that the top half of the board hangs over the edge (so that you can hammer safely) and hold it steady.

18) Place your first tack in one corner and carefully hammer it through to the other side. It will try and pull your fabric off the board when it exits the right side - just push your fabric back onto the board.

19) Hammer tacks all along the top edge of your board and then make a second (and possibly third depending on how annoyed your neighbours are with your hammering) line underneath making sure you push the fabric back each time.

20) Essentially your board is now done... although because tacks are much thinner than the holes of your spools of thread and bobbins you may want to wrap something around each tack so that they stay on better. (it's a bit precarious otherwise)

21) I used scraps of paper for my board as it gave the bulk for the width and, unless you look really closely, you can't actually see it's scrap paper, it just looks like white hooks. Get strips that are about 8cm / 3" long and about as wide as a spool of thread is high (1.5" / 4cm)

22) As tightly as you can, roll the strips of paper and glue the ends down. You will need a paper roll for each tack you have used.

23) Cover your tack with PVA and carefully push your paper roll onto the tack. Leave them to dry.

24) Finish off your board by adding picture hooks and threading some wire (or string) onto the back.

Voila! One sewing board that you can hang on your wall and keep some of your threads from getting tangled up everywhere. You can use the ribbon as a clipboard and your pockets for needles, sewing machine feet or whatever takes your fancy!


Friday, 19 October 2012

That Friday Feeling....Oranges and Lemons

"Oranges and lemons,' say the bells of St. Clement's
"You owe me five farthings," say the bells of St. Martin's
"When will you pay me?" say the bells of Old Bailey
"When I grow rich," say the bells of Shoreditch
"When will that be?" say the bells of Stepney
"I do not know," says the great bell of Bow.
Here comes a candle to light you to bed
And here comes and chopper to chop off your head!

I've had this famous nursery rhyme in my head all week for a good reason. I've been making things with an oranges and lemons theme this week. First of all, there's the Oranges and Lemons bag: 


£9.00 & p+p available in my Etsy store
Then I have also been making some gorgeous patchwork cushions with the same design as well. 
£16 & p+p for the cover, £20 incl cushion 
So it seems only fitting that this week's Friday Feeling theme should be Oranges and Lemons. There are some lovely items available on Etsy but here are my picks for the week:


Cute little felt hearts from Smika

How lovely are these napkins from LittleBirdsBoutique?

I love these sweet little boards from Recy

So what little snippets can I find you today? 


  • The phrase 'Oranges and Lemons' may be traced back to the 1600s when there was a square dance called 'Oranges and Lemons'. The actual tune and lyrics are not known but it's suspected that the lyrics are similar to those that we presently know.
  • The 'bells' referred to are all the names of churches within the city of London. 
  • You are a 'cockney' Londoner if you are born within earshot of the Great Bell of Bow - which is not actually located in the area of Bow, but is actually the bells of St Mary-le-Bow, Cheapside. The original church actually burnt down in the Great Fire of London in 1666. It was rebuilt and destroyed during the Blitz and wasn't rebuilt again until the 1960s. As it's actual location is within the heart of the City of London, it is unlikely that anyone is actually born within earshot of the bells as it's not a residential area. And for a number of years it was impossible to be born within earshot as there were no bells! So Cockney Londoners are usually thought of as those from the East End.
  • The tune of the nursery rhyme is meant to sound like the indvidual bells ringing which all have their own distinctive tune and pitch.
  • There are various theories as to what the rhyme means, including representing the difficulties that Henry VIII had with his many wives, describing public executions and references to child sacrifice. However these are mostly totally unfounded as the last two lines about the execution were added at a later date to the original lines. 
  • It is thought that the last few lines may have been added by children around 1783 when public executions at the Tyburn gallows drew crowds of up to 100,000.
  • St Clement Danes' church bell now plays the tune of Oranges and Lemons as it's ring. 
  • In Orwell's 1984, Winston cannot remember the whole of the nursery rhyme, with different parts provided by different characters throughout the novel with the final two lines coming very symbolically at the end of the novel. 
Hope you all have a great weekend! 


LinkWithin

Related Posts Plugin for WordPress, Blogger...