What you need:
A sewing machine
Thread
Two small rectangles of felt (folded should make a small page)
Some material of your choice.
Pinking shears
A button
Trimmings / Sequins / Decorative bits...
Step 1:
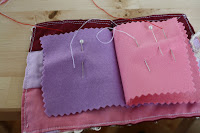
 Decide what size you want your needlebook to be. Fold 2 pieces of coloured felt and cut them to the same size. These will make a double page each. Cut around the edges of these with pinking shears to give them a zigzag edge.
Step 2:
As I decided to have a bit of a patchwork design, I cut strips of material and sewed them together - obviously if you don't want to have a multi-materialed cover then you just need one single piece of material cut to size.
Don't forget to leave a few millimetres on each side for hems. You need another piece of the same size for the inside cover.

Step 3:
Place the front and back covers together with the right sides facing each other and the inside of the material facing out. Pin them / tack them together and sew around the 2 long sides and 1 short side leaving a couple of millimetres seam allowance.
I always 'hem' the edges of my seams - use a zigzag stitch along the edges to prevent fraying and to strengthen the seam.
Step 4:
Cut the corners diagonally so that you don't have bunched up bulky bits in the corners and then turn inside-out (thus making it the right way round if that makes sense!)
Step 5:
Place your button about halfway down the sewn short side of your cover on the 'front' cover. Sew it on.
 |
| I did this in the wrong order so please excuse that I haven't put my button hook inside my cover! |
Use either a bit of ribbon or some plaited wool as a button pull. Cut to size and then place between the two pieces of unsewn material. Fold the material in and pin/tack so that you have a smooth edge encasing the button thread into it. Sew along this edge.
Step 7:
 Add any extra decorations you want - I had some pretty lacy ribbon that I decided to sew all along the edges by literally holding in place and sewing a straight line along it.
 Step 8:
Pin the felt pages into the cover - make sure that the halfway line of the pages meets the middle of the cover. Use a sewing machine to sew down the middle line - reinforce by doing this twice.
Step 9:
Fold in half with the outer cover on the outside, do your button up and then check it works. And then start putting your needles in it because you're done!


2 comments:
I saw that the first thing you needed was a sewing machine...I'M OUT!!! LOL Me and my sewing machine are not friends like that! ^_^ It's very cute though...And WOW! I didn't know you had broken your collar bone!! I could have crocheted you a sling! LOL {Sorry. Couldn't help myself.} All joking aside, I'm sure glad you're better.
The first time I made one of these I didn't have a sewing machine: did it by hand. It is just easier and quicker with one.
Collar bone is beginning to get better but I haven't been able to do much crafting for the past 6 weeks now :-( Hoping it will all heal properly...
Post a Comment