Wednesday, 28 September 2011

Project Update

I bet you're all wondering whether I actually still do anything crafty these days - I haven't blogged about my own craft projects for a while but that's not to say I haven't been doing anything... honest! Admittedly, I haven't done as much recently as I would normally have done, partly because it's a new school year and things are a bit hectic and partly because I have had loads of inspiration but no motivation. What is it that Einstein (Eddison?) said? Genius is 1% inspiration and 99% perspiration? Well I'm lacking in the 99% bit at present!

I have, however, been doing some things of late...

I know a number of you who read this know me from Twitter as well and may well have noticed that I've been mentioning penguins the last few days. Some of you may also have seen said penguins. I broke a very old keyring the other day but while the charm bit had fallen off, I still had the actual ring. Coupled with a whole load of felt I've had hanging around looking at me for a while now, I got to thinking... I needed a new keyring charm. I can't say I went through a whole load of designs before I got to this one - one of my favourite animals is a penguin and it seemed quite natural to make a penguin. So this is what I made:


Well, I couldn't leave him all lonely, could I? On Tuesday I went to the local hardware store next to work and bought some key rings. So what have I been doing this evening? Yup, I've made some more. The penguin family is now at 5. I have plans for green, red and turquiose ones but at present haven't got any suitable ribbon for them. The red ribbon I have doesn't sit right with my red felt and, when put with the green felt, is a bit too Christmassy. So I need to get some pretty ribbon... I know just the place. I have a question for you: do you prefer the penguins with the white stitching or the ones where the stitching is a near match to the felt? I thought I'd prefer the stitching to be the same but I'm not sure...


What else? Well back in April I wrote a post about bags (you can see it here). The first bag I showed you was the crazy crazy wool bag. I had finished the main part of it and most of the lining but couldn't find any buttons suitable. Do you know how hard it is to find really large wooden buttons? Oh my, it's been a nightmare! BUT... I have finished the crazy wool bag, and in fact have used it a number of times too. I've realised I made the strap a little too long so I am going to pin it and sew it a bit shorter but otherwise I am quite happy with it. Do you like the buttons?


I"m not done yet!!! I have also made a few new mosaic pendant designs! There should be one more but I managed to break it while trying to grout it this evening so I need to take it to pieces and start again. It was my favourite design but the one I knew was the most precarious due to the millefiori I had used in it.


Sadly I've only just taken the photos of these and as it's quite dark in the flat the photos haven't totally come out. The paler one is light green and orange porcelain - totally upcycled materials as they used to be plates belonging to a friend of mine. I couldn't get a close up shot without it all going blurry but once I have the right light I will try to. Of the larger shots, the top one is a repeated red, purple and turquoise mirror design while the lower one has become known as the Google pendant because it's colours match Google's.

Just to let you know - once I have managed to take some decent shots, the key-rings and pendants will be going into my Etsy store - or if you would like one and can't wait for me to take pictures and list them, get in contact with me via the contact section of this blog and I can let you know prices / payment arrangements etc.

Monday, 26 September 2011

A Bit of Blog Lovin'


This month I'd like to recommend Tales from Mount Pleasant as my blog of choice. Anthea, the lovely person behind it, is also the face behind Forest Flower Designs as well as being a mum, helping with her partner's business and writing lovely reviews for Barefoot Books. I always visit Anthea's blog on a Sunday because her Silent Sunday posts are always beautiful - she loves taking pictures and that comes out in her pictures. If you haven't already discovered Tales for Mount Pleasant then you should definitely go around there and see what it's all about.

Saturday, 24 September 2011

Just 3 words

A while ago there was a thread in one of the Etsy discussions about suggesting three words as ideas for a member's poetry. I liked the idea so I chose some words to give:

Star


Harmony


Warmth

I was thinking about these three words earlier today and the challenge that they pose. I thought I'd give poetry a go myself... (watch out!!!) As I'm not a poet, I've nicked a structure that I've used with the kids in my class before. It's from The Magic Box by Kit Wright (I couldn't find the whole poem from a suitable website but you can see the first bit of it here) The original was published in his collection Cat Among the Pigeons, 1987 and is a popular poem to use in schools because there is so much you can do with it. Anyway, here's my version:

I will put into a box
A shimmering star falling from the sky
Reminding me of nights long passed
And making me calm.

I will put into a box
A land of peace and harmony
Where all live alongside one another
And none need show fear.

I will put into a box
A roaring fire bringing me warmth
On a cold winter's day by the hearth
And a balm for the soul.


Hmm, yup it's definitely not time to quit the day job! I think I'll leave poetry to those who can actually write from now on. Maybe I'll just use these three words as inspiration for some new projects?

What three words would you choose? I'm intrigued...

Friday, 23 September 2011

That Friday Feeling...23/09/11

Last Saturday we went to a Masked Ball. I haven't been to a 'proper' ball for about 12 years so I was really excited about going, although I had heard some rather odd reviews so wasn't sure what to expect... But walking down the stairs to the sounds of a waltz and into a room full of beautiful people dressed to impress with their venetian masks on was almost like a fairytale. I was inspired. So I thought that I would dedicate this week's Etsy shout out to dressing up. I seem to have gone for a very red theme...

Cute little red top hat by Janinebasil

ooh la-la! A little risque but I love this corset by Luloah

LOVE these polka dot shoes with red ribbon roses by Tuppencehapenny

So there you go, my favourite Ball/ Masquerade/ Going out type items this week. Now I just need to get my costume ready for the Halloween ball next month...!

Monday, 19 September 2011

How to Make... a DESK-TIDY

This is what my desk usually looks like:


Don't say anything! I know it is a total disaster zone. That's partly because I am the messiest person in the entire world, but also partly because I don't actually have anywhere to put anything. So this month's How To post is the start of Operation Tidy-Up... How to make a desk-tidy. Admittedly I am not about to show you how to make a chest of drawers or anything like that - I'm starting small and working up to the woodwork!!

Materials: 
Some old tomato tins - well-cleaned and labels removed
Some pretty material that you like
display wire
a thumb tack / drawing pin / whatever you call it
ruler
good material scissors
PVA glue
container to put glue in.

Step 1:

First of all measure some material to the same height as your tin and wrap it around the tin so you have enough to go around with an overlap of a few centimetres. Use some good sharp material scissors to cut your material exactly to size.


Step 2:
Use PVA glue to stick the material down - paint glue all over your tin, line up your material with the edge of your tin and make sure the top edge will be straight. Wrap the material around, ensuring that you smooth out any creases, bumps etc as you are doing it. The material should be smooth over the tin. I used a PVA - water mix (it makes papier-mache glue).


Step 3:
Paint along the side where you have the overlap. It doesn't matter if you get glue along bits where you aren't going to stick material because you're going to paint the whole thing again anyway - and even if you decide not to do this, PVA dries clear. Still keeping the material taut, glue the overlap onto the material and smooth the whole thing over. I then painted my glue-water mix over the whole time and waited for it to dry. Obviously that just meant I had time to make some more tins...


Looking at these I thought....hmmm, boring and a bit messy. So I carried out an investigation of my sewing box and found some ribbons. I decided that red would look best of the options I could find and decided to line the tops of my tins with some ribbon.


Step 4: 
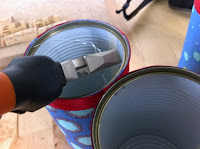
Measure the ribbon so that it fits exactly around the top of the tin with a few centimetres of overlap. Paint glue onto the entire length of the ribbon and carefully stick it along the top edge of your cans.


Step 5: 
Now you get to the tricky part... getting your tins to stay together and not just sitting on your desk as seperate tins. I experimented with all sorts of things before I worked out how to do this bit. Luckily you have me to do the experimenting for you...

Get a drawing pin (pin tack or whatever it's called in your part of the world) and press it through the tin in the upper edge. Make a second hole next to it. Do the same about half way down the tin. These holes are to thread the display wire through and hold the structure together.

TIP: Make your holes at the place where your ribbon or your material overlapped - when you attach the other tins, the overlap won't be visible any more...

Step 6: 
Do the same in the same places on the other tins. Now cut a length of display wire - about 8 - 10 cm. Thread it into the lower holes first - in to one side and then twisting the wire round to come out of the other hole. It's easy enough getting it in - it's the threading out the other side that's the tricky bit!  Do the same with a second piece of wire on the upper two holes as well.


Step 7:
Line the second tin up with the first (the one with 2 bits of wire sticking out of it) and, starting on the lower wire thread, push the wire ends into the holes on the second tin. Do the same with the upper wires before trying to properly attach the lower wires.


Step 8: 
Finally use a pair of pliers to pull the wires tight together and twist them so that they are secure. I then taped my wires to the side of my tin so that I didn't get them caught on either myself or something in my tins.


I did the whole process with another tin, and I actually made a smaller version with two old tuna tins too... so now my desk has lots of desk-tidys on it! Shame I haven't yet got around to tidying the rest of it...!


Friday, 16 September 2011

That Friday Feeling...16/09/11

Ahoy there me hearties, on Monday it be 'Talk Like a Pirate' Day so we'll be thinking about them pirates this week. And that's about the extent of my pirate talk...! Pirates seems fitting enough to me - we're going to a masked ball on Saturday and I still don't have a costume: if only I'd looked on Etsy 2 weeks ago as there are LOADS of pirate costumes - yes for adults too! But I thought I'd give you the fun pirate bits that I found. Enjoy!

I love niftyknits' meerkats and this pirate is no exception!

For those who want to be pirates - some shelf blocks from SparrowPrimitives.
How awesome are these cufflinks by bitsandbadges? Lego AND pirate! 

A few random facts about pirates for you... these may or may not be totally made up!!
  • Pirate believed that having women on board was very bad luck, and whistling could make the weather turn stormy, apparently that's where the saying 'to whistle up a storm' comes from.
  • Pirates would almost always steal their ships - buying one was too risky as they might be recognised and sent to jail!
  • While pirating has been happening since at least the 15th century, it was most rife between 1690 and 1720.
  • Pirates were very democratic - they held votes as to which way to go and which colonial ships to attack. Each member of the crew had a vote. They also all got an equal share of the booty with a few members of the crew (captain, ship's pilot, cook, carpenter etc) getting a double portion.
  • A pirate captain was actually a battle leader, not a captain; he led the attacks on other ships - the real captain was called the ship's pilot and gained an equal share of the booty as the captain.
  • The word Buccaneer comes from the pirates - it derives from the word 'boucan' which is a way of cooking meat over an open fire, like a barbeque. Pirates often landed in places where there were cattle or other herds - they would catch and kill larger animals and then roast / cook them over open fires.
  • 'Pieces of eight' were actually Spanish 'reales' coins, and were the most common form of currency aboard pirate ships. 'Doubloons' were Spanish 'escudos' - large gold coins which were of the highest value.
  • Pirates pierced their ears because they believed that gold and silver in their earlobes would improve their eyesight... ???!!!
  • There is no evidence that pirates ever made treasure maps (none have been found) or that pirates ever made people walk the plank - walking the plank is a Hollywood invention, pirates preferred to just toss people overboard. And they didn't really 'arrrrrgh, and 'urrrrrgh' either - that's another Hollywood myth because the actor who played Long John Silver in the 1950s version of Treasure Island came from the Cotswalds, England and had a regional accent. 

Wednesday, 14 September 2011

Reading a Little...September

I feel like I haven't really been reading very much this month. That's not entirely true; I haven't really read many books that I would recommend to others - or rather ones that really stand out as being fantastic and unmissable. I've read quite a few books but they've been mostly a little bland. Not to say I wasn't happy to read them: I'm ALWAYS happy to read (except for maybe The Unfortunate Traveller by Thomas Nashe - have given up on that one!) It's just that I'm not going to jump and dance about books that are a bit sentimental and not really great. But anyway, here are my picks for this month:


The Elegance of the Hedgehog - Muriel Barbary
I was a little underwhelmed with this - it's the story of an apartment block in Paris and how the death of one of the residents creates a dramatic change in the everyday workings of the building, especially it's concierge, Renée and 12 year-old Paloma Josse, a rather spoilt resident. Both are living in a dream-like state: they show the exterior world one thing, while the novel examines their inner thoughts and expressions. I've added it this month because... the ending. Oh my, it's worth it for that! I spent most of the novel thinking 'yeah, well, I'm not that excited' and then suddenly about two thirds through I realised that actually I was really interested and I suddenly realised I really cared about the characters. So for that reason it makes it into my recommended reads this month. 


The Spy Who Came in From the Cold - John Le Carre
I haven't read any John Le Carre before. Probably because I associate him with an older generation. But this is one of the 1001 Books You Must Read Before You Die so I thought I should give it a go. I wasn't disappointed - LeCarre uses an easy writing style and you fall straight into the plot. We follow the story of Alec Leamas over a fairly short period of time: his return to Britain from Berlin, his 'retirement' and subsequent fall into depression and drink and then how he is picked up by the other side to trade British secrets. A plot full of twists and turns and you need to keep recalling tiny little points from earlier in the novel - very clever and I really enjoyed it. I'm looking forward to reading Tinker, Tailor, Soldier, Spy and watching it in the cinema. 


The Hunger Games - Suzanne Collins
Every now and then I totally avoid a book because of the hype around it. The Hunger Games is one of those books - I've been hearing how good the series is for well over a year now and the more I heard, the less I wanted to read it. I figured that I'd probably be disappointed. I wasn't. I started reading this on Saturday morning. Over the weekend I had a whole load of things to do, people to meet etc etc. I finished it about Sunday lunchtime. I was literally glued to this - a really dark and twisted tale that has you biting your finger nails and grimacing in places. But so fast paced and so full of twists and turns, you can't put it down or come up for air. I absolutely loved this and have been recommending it all over the place. Katniss Everdeen volunteers to take part in the Hunger Games in order to save her little sister. And so it all starts... Definitely worth reading. 

Monday, 12 September 2011

That Friday Feeling...13/09/11

You may have missed my Friday Feeling post last week. That's because I've just gone back to school (for those of you who aren't aware, I'm a primary school teacher, presently with Year 6). I have not stopped working, thinking about work, stressing about work and generally being work focused for the past week and as a result my blog has suffered a little. I am sorry...

But it did jump out the theme for the Friday Feeling post... BACK TO SCHOOL!! While I work in an area where children come to school equipped with absolutely nothing other than themselves, I know that in the U.S. for examples, parents are asked to equip their children with all sorts of things for the upcoming year. So here are some cute items that I have found on Etsy which may (or may not) be useful - they are all definitely cute!!

Who doesn't want one of these cute chalkboard signs by UtopiaUF?

Love the look of this journal by SewDanish.

Help your child learn the alphabet with these tactile letters by MyWifeYourWife

Wednesday, 7 September 2011

Homemade milkshake

Last week Tesco totally messed up my usual order - they substituted fresh fruit for frozen fruit and because of the packaging, I didn't realise until too late... we ended up with loads of squishy fruit in the fridge which I had accidentally defrosted without realising it was meant to be in the freezer. Yuck. There went my great yoghurt with fresh fruit breakfasts...

BUT! I came up with a plan... I used to make my own fruit juice quite a lot. I'm not lucky enough to have a juicer machine but it's fairly easy if you have a blender. So I made up some fruit juice (yum) and then had a bit of an inspiration.... MILKSHAKE! ooooh....

I'm not a fan of milkshakes generally as they tend to taste very artificial - well certainly the ones at MacDonalds do, and also I'm not a massive fan of ice-cream either. But surely, homemade milkshake can't taste artificial? And it doesn't HAVE to have ice-cream, does it? So I decided I would make my own personalised version.


Looks good? Tastes good too...

Thought I would share the incredibly complicated recipe with you:

Summer Fruits Milkshake

Ingredients:
3/4 glass of semi-skimmed fresh milk
about 4 tablespoons of summer fruits
teaspoon of sugar.

Preparation:
1) Put all the ingredients into a mixing bowl / measuring jug and whizz up with your blender. If it tastes too milky add a bit more fruit or a bit more sugar.

You can drink it straight off, but I'm a bit fussy about things being too thick and bitty so:

2) Pour the mush through a sieve into a glass - you will need a spoon to move the pips out of the way and allow the milkshake to pass through and I had to do it in 2 bits, emptying the extra pips out of the sieve in between.

Voila, tasty homemade milkshake. OK fruit'n'milk drink. But still probably quite healthy and a lot better for you than shop bought stuff as it has no extra ingredients in it. Enjoy!


Oh, as a side-note: I also made raspberry and fruits of the forest milkshake. I'm sure you can use any fruit you wish to really. Although apples tend to puree so possibly not them, and I can't imagine orange and milk being a good combination...

Monday, 5 September 2011

Product Review: Funky Diva iPhone Case

Exciting news! The lovely Anna from FunkyDivaDesigns asked me to sample one of her new products for her. In case you haven't come across FunkyDivaDesigns, you really should check out some of her bags because they are gorgeous and I would love to have one. As well as her site, she sells on Folksy  and is on Twitter too. Anyway, Anna asked me to try making one of her iPhone Kits and let her know what it was like. So here you are: my first product review!

A few weeks ago Anna sent me a sample kit which looked like this: 


Looking good hey? I was quite excited to get this and thought the material was quite cute too. Once I opened the packet I realised that all the pieces I needed had been pre-cut to size, including interfacing, pockets and the tag for the keychain. There were also some very comprehensive instructions which included pictures making it much easier to follow. There are 15 steps in all, but they show you how to pin, where exactly to sew and are broken down into very small pieces of information.


On the first page there was a list of everything I should have in the packet so that I could check and then it was merely a matter of following the instructions. Which was easy! Because Anna has broken the steps down into small pieces of information even someone who isn't good at following instructions (like myself) can follow! It was super easy to make!

My sewing machine decided to play up today - for some reason it was like a petulant child and wouldn't get the tension right whatever I did - but even so it still took only about an hour to finish my new iPhone case because FunkyDivaDesigns has put together such an easy to follow set of instructions that it took no time to assemble.


I would definitely recommend these for beginner sewers who want to make something fun and funky but don't have the experience to make their own patterns. They would make good gift ideas and, while they are aimed at adults, I think grumpy teenagers could be inspired to make themselves a cute homemade phone case too. It was also nice to take a break from the quilt project which had been going on forever and do something quickly and actually finish it! So thank you FunkyDivaDesigns for asking me to give it a go - now everyone else you need to go over to FunkyDivaDesigns and get yourselves a cute DIY phone case kit!


Friday, 2 September 2011

That Friday Feeling...02/09/11

Happy Birthday to me, Happy Birthday to me... yesterday was my birthday so today's Etsy shout-out is, of course, dedicated to birthdays. While I'm trying not to think that I'm yet another year older, I do always quite like birthdays - it's a great excuse to get all your friends together and have a party! So here some things I think should be celebrated today:

Cute polymer clay trifle earrings by GiraffesKiss

Love these party favours from KoalitaCraft

And it wouldn't be a birthday without some cake! Necklace by tyney123
As always a few birthday facts for you...

  • The song 'Happy Birthday' was first written in 1893 It was copyrighted for the first time in 1935 and is the third most popular song in the English language. Apparently Auld Lang Syne and For He's A Jolly Good Fellow beat it in terms of revenue from copyrights!
  • More people have birthdays in August, September or October than any other month. And apparently in the U.S. the LEAST likely date for your birthday to land on is May 22nd. I know someone who's birthday is May 22nd. But she's not from the U.S...
  • If you are in a room with 22 other people, there is a 50% chance that someone shares the same birthday as you. And if you are in a room with 56 other people this chance goes up to 99%.
  • I like the idea of un-birthdays... you can celebrate your un-birthday on any day of the year that isn't your birthday. I think I'm going to have 364 un-birthdays this year - today is my first! 
  • Each month has its own birthstone - September is Sapphire as I'm sure lots of you know. But did you know that there's a rhyme for the birthstones? It was first published in a pamphlet from Tiffany&co in the 1870s by an unknown author, and there is a copy here, thought I'd give you my verse: 
A maiden born when autumn leaves
Are rustling in September's breeze,
A sapphire on her brow should bind
To bring her joy and peace of mind.


LinkWithin

Related Posts Plugin for WordPress, Blogger...