Showing posts with label how to. Show all posts

Wednesday, 27 February 2013

How To... Curate an Etsy BNR


This weekend I will be spending a fair amount of time on Etsy... who am I kidding? I'll be spending the entire weekend on Etsy! I'm going to be helping to curate on the British Emporia team weekend BNR. A BNR basically means Buy And Replace - you browse in all the shops featured and, if you like something from a particular shop, call out to buy it. If the curator gives you the go ahead, you buy, post the transaction link and your shop replaces the shop you bought from. It's a great way of getting views on Etsy and also for finding presents for people, getting to know other Etsians through the chatting ... and I'm slightly addicted to them!
Anyway, this weekend British Emporia are holding their first BNR as a new team and a number of team members have asked about how to curate. So I thought that a useful tutorial this month would be a HOW TO CURATE blog post. So here goes...


1) If you are a curator the main thing you need to do is keep refreshing the page that the treasury is on - some browsers automatically update but I know that my Google Chrome requires me to do so myself. So every few seconds or so you need to refresh the page so that you can keep up with chatting and check if anyone has called for a shop. People call out for a shop by saying the name of the shop in capital letters.


2) If no one else has already called for the shop, you can then give the go-ahead. You post in the thread the name of the shop calling and the name of the shop called, e.g:

Go Ahead: CREATING TROUBLE for DKDA 


It's a good idea to write down who is going to replace who at this point as if it gets busy with 2 or 3 sales going through, it's sometimes hard to remember who is replacing who.

3) What I always make sure I do is have 2 tabs open - one with the published treasury on it which I keep refreshing every few seconds to look out for new call-outs and one with the treasury but available in edit mode. (I've used an old BNR tab which is why it says CLOSED at the moment)


4) While the person who is buying is going through their transaction process, I usually open a third tab with the buyer's shop in it so that I can browse through their items and find something to replace the present slot (the shop that is being bought from) Look for the listing number and copy it:


5) When the person who is buying from a current shop in the treasury posts their transaction link, you need to check the link to make sure it is over the minimum spend - it won't actually say the cost of the item there but it will give you some similar items to look at with similar pricing and you can judge from there. Most people write the cost of the item before shipping as well so that makes it easier, but it's still a good idea to get in the habit of checking.


6) If the transaction meets the minimum requirements, you can switch the buyer's shop in by removing the shop bought from.
 In your editing tab click on 'edit


6) Now if you hover over one of the items you can see an edit or remove tab. Click edit on the shop that is being bought out and replace the current listing number with the listing number of the shop to be bought in.


7) Now go up to the top of your editing screen where the title and tags are and amend the number of sales in the title (to 1 more!) 


8) Now all you have to do is press SAVE at the bottom of the treasury and... voila! You have successfully done a shop switch!


There are some things you need to remember though....


  • Keep one tab with the published treasury open and make sure you refresh it constantly - while you are dealing with one sale, another buyer might call for a shop and you need to spot it! 
  • If someone calls for a shop that has already been called for - or if two people call quite close to each other it is a first-come-first-served principle - give the go ahead to the person who called first and politely tell any other callers that it's already been taken. 
  • Don't switch shops until the transaction link has been posted - you need to check each shop has at least spent the minimum spend. This means AFTER discounts and BEFORE shipping.
  • Lots of shops will offer discount codes so one other thing you need to do as curator is make sure that you keep the discount code list updated. 


Monday, 22 October 2012

How To.. make a SEWING BOARD

Does anyone else experience the disaster of the sewing box? Admittedly I usually use a tin for all my threads - I have a gorgeous sewing box but it's totally full up with ribbons and fabrics so my threads end up drawing the short straw and living in an old chocolate tin. I can't even bring myself to show you a photo of what it normally looks like but trust me when I say it usually takes about 20 minutes to get some thread out of it.

I came to the end of my tether with it all this week and decided enough was enough! I need something that will keep all my threads and bobbins separate. So I thought I'd make a 'sewing board' - basically a sewing box on a pinboard! Here's this month's How To tutorial. Hope it helps!

What you'll need:
1 piece of board
Enough fabric to cover the board
Some wadding (optional)
Tacks - choose long ones that are about the length of an average spool of thread
Hammer
Glue - fabric spray adhesive works best but PVA will work if you haven't got anything better to hand!
Scissors
Ribbon for 'washing line' effect
Some fabric in a contrasting colour for pockets
Elastic
Sewing machine (not essential)

What to do:


1) Cut your board to the size you want - if you are using a saw please be careful and keep fingers away, always saw on a stable surface and follow the instructions.


2) Cut a piece of fabric a little larger than the piece of board you want to cover. I used an old scarf that I never wear and the width was almost right. You need a few inches on all edges.

3) If you want a padded board (that you can then stick pins into or add extras to) then cut some wadding to the same size as the board and use spray adhesive to stick it on securely. If you don't have spray adhesive, just use whatever you do have - I only had PVA when I made mine and it still sticks it fine!

4) Start with your pockets - this is where I can't give many photos as I stupidly decided to do mine at the end so had to hand sew them on and it resulted in bent needles! BUT... start by drawing yourself a semicircle on some pretty fabric with a widened flat top. Remember there will be seam allowance so think about how big it will be when you fold over the seams.

5) Cut out your semi-circle and then cut 2 pieces of fabric using the semicircle as a template.

6) Fold over about an inch from the top of your semi-circle and pin it. If you place your pins at 90 degrees to the line you sew, you don't need to tack it as well.

7) Sew in a straight line near the edge of your seam leaving a good half inch space between the top of your semi-circle and your seam.


8) Attach a safety pin to the end of some elastic (don't cut the elastic yet!) and, using the safety pin to hold onto, thread your elastic through the seam.

9) Sew along one edge of the elastic to hold it in place. Then pleat up your fabric until it is about half the width it was before and sew the elastic in place on the other end. Repeat Step 6-9 with the other pocket.


10) Place your fabric over your board, right side facing up. Adjust so that you know exactly how it will fit (with an even amount hanging over each side. Place your two pockets about half way down and fold under the edge of the unsewn edges. Pin in place, making sure you pin the pleats too - you don't want to sew the fabric straight.

11) Sew along the folded edges of your pockets, leaving the elastic opening free.


12) Now for attaching the fabric to the board... Place your fabric face down on a flat surface. Spray your board's padded side liberally with adhesive - or smother it evenly with glue if that's what you are using.

13) Carefully turn the board over and place it centrally over the fabric and press down. Trim the corners so that you don't have too much bulk.

14) Pull the top edge taut over the back of the board and glue it down. Do the same to the other edges. Make sure you keep it as taut as you can as otherwise you'll end up with puckered fabric.

15) Cut a piece of ribbon about 3 - 4 inches longer than your board. Glue one side of it and attach it to the back of your board, below your pockets.

16) Turn your board over and stretch your ribbon tight over your board in a straight line. Pull it around to the back of the board and glue the other end onto the back. Make sure you keep it taut throughout this. This will give you a cute little 'washing line' that you can pin things onto with pegs or, if it's taut enough, you can keep paper safe by tucking it under.


17) You're ready to do some hammering! Turn your board so that you have the wrong side up and put it on a stable surface. Balance it so that the top half of the board hangs over the edge (so that you can hammer safely) and hold it steady.

18) Place your first tack in one corner and carefully hammer it through to the other side. It will try and pull your fabric off the board when it exits the right side - just push your fabric back onto the board.

19) Hammer tacks all along the top edge of your board and then make a second (and possibly third depending on how annoyed your neighbours are with your hammering) line underneath making sure you push the fabric back each time.

20) Essentially your board is now done... although because tacks are much thinner than the holes of your spools of thread and bobbins you may want to wrap something around each tack so that they stay on better. (it's a bit precarious otherwise)

21) I used scraps of paper for my board as it gave the bulk for the width and, unless you look really closely, you can't actually see it's scrap paper, it just looks like white hooks. Get strips that are about 8cm / 3" long and about as wide as a spool of thread is high (1.5" / 4cm)

22) As tightly as you can, roll the strips of paper and glue the ends down. You will need a paper roll for each tack you have used.

23) Cover your tack with PVA and carefully push your paper roll onto the tack. Leave them to dry.

24) Finish off your board by adding picture hooks and threading some wire (or string) onto the back.

Voila! One sewing board that you can hang on your wall and keep some of your threads from getting tangled up everywhere. You can use the ribbon as a clipboard and your pockets for needles, sewing machine feet or whatever takes your fancy!


Tuesday, 22 May 2012

How to Make... a lino-print

Lino printing is a good way of producing the same design lots of times - once you have cut your lino design, you can use and re-use your print as often as you like. All you need to do is make sure you wash your lino stamp after every use and get as much of the paint off as you can.


One word of warning about cutting lino though - those blades are sharp, please always cut away from yourself and keep your fingers well out of the way.


1) Draw out your design on some paper in the size you want it to be.


2) Transfer the design onto the lino by cutting around the outside edge and then cutting out each of the different parts


3) Using a fine lino blade, cut around the edges that you need.


4) Now start getting rid of all the excess lino - use one of the wide blades to clear as much as you can. The bits that are cut away will not be part of the design, the raised bits that you leave behind are the design that will end up being printed and transferred.


5) You want to get a difference between levels - the bits that are going to be printed need to be as high as you can and try to get a 90 degree angle on the edges if at all possible. Use you favourite blade to cut away and smooth out the lino.

6) If you have large areas at the side of your lino block that are not part of the design, it's a good idea to trim these edges off - that way you won't accidentally get paint on them which might smudge onto your design.
7) Once you have finished cutting your lino, you are ready to print! All you do is cover the raised parts of your lino block with paint (Acrylic is probably best. If you are printing onto fabric then mix it with a fabric medium)

8) Turn your design over and place it carefully onto your object to be printed. Press down hard and make sure you press over all the different parts evenly or else it will come out fuzzy around the edges.

9) Carefully remove your lino block from the print and... wow that looks awesome!


Now that you've made your lino print, you can print the same design again and again and again and a-  ... you get the picture!

Monday, 2 April 2012

How to...Make Bunting

I haven't done a How To post for ... nearly a year maybe? It's one of the things that fell behind and didn't get picked up again. Partly because I was busy, partly because I had a great idea for a how to and it didn't ever get made, partly because... oh I don't know these are all excuses!

But anyway, enough of that. On to this month's tutorial: How to make bunting. I used this at my craft fair last week (and sadly only managed to get the one photo so sorry for repeating a picture so soon!) and I got a few comments on how good it looked. I have grand plans to add lettering to my bunting at some point in the near future but here is a basic tutorial for you to get started on!

I couldn't find two of my triangles so they have been left off - but now I've found them, they're being added! 

You will need:
material
scissors
fabric scissors
some card for a template
pins
matching thread
preferably a sewing machine (or it'll take a while!)

What to do:

1) Cut a triangle out of card as a template - it needs to be the size that you want your bunting triangles to be.


2) Spread out your material and draw around the triangle on the wrong side of the material. Leave plenty of room around it for seam allowances and draw more triangles. You will need 2 triangles for each bunting triangle so 18 is probably a good number (will make 9 triangles which should be enough).

3) Cut around the triangles leaving plenty of room for seam allowance. Once you have cut out the triangles, cut the corners off close to the point of the corners


4) Place 2 triangles together - right sides facing in. Pin them together along the two longer sides leaving the top edge open. My top tip is: if you pin at 90 degrees to the line, then you can sew straight over the pins with your sewing machine. I usually get a bit scared just before sewing over so I take the pin out just as I come up to it.


5) Sew along the two edges that you have pinned. Snip off the excess material in the seams and tie the ends.

6) Turn the triangles the right way around. Use a pencil/ the end of a paintbrush to push the end corner out as far as you can so that it makes a point.

7) Iron your triangles so that the seams are exactly at the edges. Make sure you iron both sides though.

8) So far so good - that wasn't hard, was it? Now for the slightly more tricky bit (but still pretty easy!)
Cut a long strip of material (the length you want your bunting to be) about 8 - 9 cm wide. For my bunting I recycled an old sheet so I just used the length of the sheet for mine.


9) Fold and iron the edges of the material into the middle so that the width is now half of what it was.

10) Fold the material in half and iron again so that now you have the actual width of your bunting line and you have some easily ironed lines that you can sew down.


11) Find the half-way point in your long strip and stick a pin in it to mark where you are. Now take one of your bunting triangles and slip the open edge of your triangle between the two halves of your bunting strip. Line up your halfway mark pin with the end corner of your triangle and then pin the triangle in place.


12) Decide how much space you want between your bunting triangles and pin the next triangle into your strip. Measure the distance between the two triangles as you will need to have all your triangles evenly spaced. On the other side of your middle triangle, measure the distance and pin the next triangle in place. Continue until you have all 9 triangles pinned: one in the middle and four on each side.

13) Fold the ends of your strip in so that you have no raw edges and pin them.


14) Starting at one end of your bunting strip, sew along the edge from one end to the other. Make sure you are fairly close to the open edge as you don't want open edges.

15) Tie up the ends, snip close to the tie so that it's nearly invisible and ... wow that was quick!


Monday, 19 September 2011

How to Make... a DESK-TIDY

This is what my desk usually looks like:


Don't say anything! I know it is a total disaster zone. That's partly because I am the messiest person in the entire world, but also partly because I don't actually have anywhere to put anything. So this month's How To post is the start of Operation Tidy-Up... How to make a desk-tidy. Admittedly I am not about to show you how to make a chest of drawers or anything like that - I'm starting small and working up to the woodwork!!

Materials: 
Some old tomato tins - well-cleaned and labels removed
Some pretty material that you like
display wire
a thumb tack / drawing pin / whatever you call it
ruler
good material scissors
PVA glue
container to put glue in.

Step 1:

First of all measure some material to the same height as your tin and wrap it around the tin so you have enough to go around with an overlap of a few centimetres. Use some good sharp material scissors to cut your material exactly to size.


Step 2:
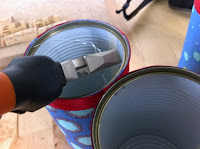
Use PVA glue to stick the material down - paint glue all over your tin, line up your material with the edge of your tin and make sure the top edge will be straight. Wrap the material around, ensuring that you smooth out any creases, bumps etc as you are doing it. The material should be smooth over the tin. I used a PVA - water mix (it makes papier-mache glue).


Step 3:
Paint along the side where you have the overlap. It doesn't matter if you get glue along bits where you aren't going to stick material because you're going to paint the whole thing again anyway - and even if you decide not to do this, PVA dries clear. Still keeping the material taut, glue the overlap onto the material and smooth the whole thing over. I then painted my glue-water mix over the whole time and waited for it to dry. Obviously that just meant I had time to make some more tins...


Looking at these I thought....hmmm, boring and a bit messy. So I carried out an investigation of my sewing box and found some ribbons. I decided that red would look best of the options I could find and decided to line the tops of my tins with some ribbon.


Step 4: 
Measure the ribbon so that it fits exactly around the top of the tin with a few centimetres of overlap. Paint glue onto the entire length of the ribbon and carefully stick it along the top edge of your cans.


Step 5: 
Now you get to the tricky part... getting your tins to stay together and not just sitting on your desk as seperate tins. I experimented with all sorts of things before I worked out how to do this bit. Luckily you have me to do the experimenting for you...

Get a drawing pin (pin tack or whatever it's called in your part of the world) and press it through the tin in the upper edge. Make a second hole next to it. Do the same about half way down the tin. These holes are to thread the display wire through and hold the structure together.

TIP: Make your holes at the place where your ribbon or your material overlapped - when you attach the other tins, the overlap won't be visible any more...

Step 6: 
Do the same in the same places on the other tins. Now cut a length of display wire - about 8 - 10 cm. Thread it into the lower holes first - in to one side and then twisting the wire round to come out of the other hole. It's easy enough getting it in - it's the threading out the other side that's the tricky bit!  Do the same with a second piece of wire on the upper two holes as well.


Step 7:
Line the second tin up with the first (the one with 2 bits of wire sticking out of it) and, starting on the lower wire thread, push the wire ends into the holes on the second tin. Do the same with the upper wires before trying to properly attach the lower wires.


Step 8: 
Finally use a pair of pliers to pull the wires tight together and twist them so that they are secure. I then taped my wires to the side of my tin so that I didn't get them caught on either myself or something in my tins.


I did the whole process with another tin, and I actually made a smaller version with two old tuna tins too... so now my desk has lots of desk-tidys on it! Shame I haven't yet got around to tidying the rest of it...!


Wednesday, 3 August 2011

How to...Make GIFT-TAGS

This is a bit of a cheat How To... I was doing a bit of a sort out and came across a whole load of stickers I'd got from CraftCreations ages ago. It was a selection pack and to be honest I don't really like most of the stickers I'd got in the pack - they are a bit bright and gaudy for me as a rule. But then I got to thinking that actually I could use them on some quick gift tags. And having just come across some bits of card from years ago as well I thought I would combine them. So here is a very quick and easy (we're talking less than 5 mins) how to for you. 


Materials:
Coloured card
Ribbon
Peel-Off Stickers
Hole punch
Corner punch


1) Use a craft knife to cut your card into a size that works for you (I didn't measure mine - but using the squares on my craft board they're about 7 squares by 5)

 2) Hole punch in one corner of the card piece. (Looking very easy so far, right?)
 3) I've got an embossing corner punch (that I NEVER use!) and used it to punch in each of the corners of my gift-tag making a softer, fancier edge.

4) Place the hole-punched corner into the top left and then put some stickers around the bottom and right-hand edge. The great thing about these stickers is that you can take them off without leaving marks so if you make a mistake or don't like it, you can re-do them!


 5) Thread some ribbon through the hold in the corner making sure you have enough to make a bow and have threads left over. Tie as if you are doing your shoelaces up.


6) Hold the bow together and pull the ends down so that you make a tight bow that has long ends. And voila! Your gift tags are done!


Obviously I didn't stop at one - as these take so little time, I made a few... Sorry the photos are a bit blurry - the light had gone by the time I got round to taking photos of them!


LinkWithin

Related Posts Plugin for WordPress, Blogger...